Smart Fuzzing Proxy
Contents
Installation
Prerequisite
Make sure the following prerequisites are met.
Set-up a Virtual Environment
The Fuzzing Proxy requires a set of external libraries which must be installed beforehand. To get you started as easy as possible, a helping Monkey (based on the Infinite monkey theorem) is provided to assist you with your fuzzing endeavor. Provided that your system meets the prerequisites, instruct the Monkey to setup a virtual environment for you:
./monkey setup
This will create a Python virtual environment in ./venv directory.
Manual Set-up of a Virtual Environment
The previously introduced Bash script provides an easy way to set up a virtual environment and installation of all required dependencies. However, the script might fail or you just might want to set up the virtual environment on your own. In this case the following steps will be required.
- Create a virtual environment with
python3 -m venv {VENV_DIRECTORY} - Activate the virtual environment with
source {VENV_DIRECTORY}/bin/activate - Install
pipenvfor your virtual environment withpip install pipenv - Install all required libraries with
pipenv install- if installation fails with a
FileNotFoundErrorprobablypdflatexis missing as discussed on GitHub - Quickfix: simply install LaTeX with e.g.
apt install texlive-latex-baseand repeat step 4
- if installation fails with a
Note
If you choose to create your {VENV_DIRECTORY} other than ./venv the Monkey won’t be any longer able to find your virtual environment.
To overcome this issue you will either need change the directory in the monkey script or simply replace monkey with python3 proxy.py
in the following examples.
Quickstart
To start the Fuzzing Proxy against iot.eclipse.org:1883 with a sample configuration execute the following command:
./monkey fuzzing -l 1883 -r iot.eclipse.org -c resources/samples/mqtt_01.json
This will start the Fuzzing Proxy which will proxy the MQTT traffic from your local machine to iot.eclipse.org
and vice versa.
You can further explore the functionalities provided by the Fuzzing Proxy by using the built-in help.
./monkey --help
./monkey {command} --help
Important
Do not fuzz against production environments or systems other than your ones without permission.
General Concept
The Fuzzing Proxy is a MITM (Man-in-the-middle) Fuzzer which is capable of proxying the network traffic between to systems and altering this traffic on behalf of predefined rules. The Fuzzing Proxy does not generate any message on it’s own. To trigger the fuzzing you need to provide (more or less) valid templates.
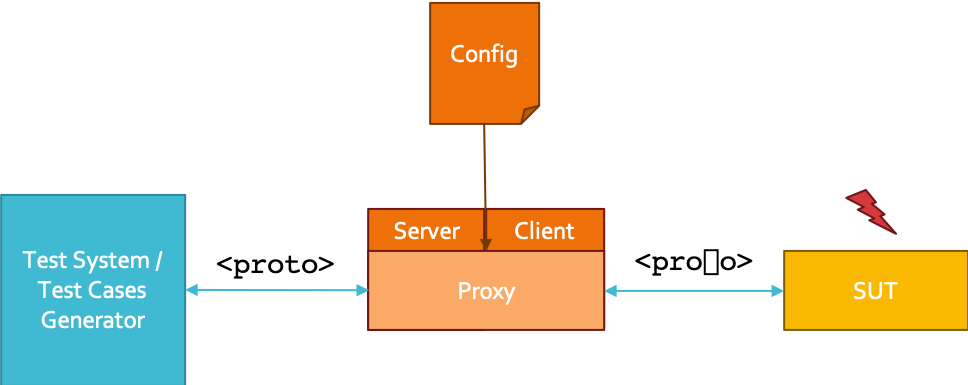
In the next sections we will show you how to use the Fuzzing Proxy by applying a 5 Steps Fuzzing Workflow as shown in the following graphic.

Identify the SUT
Identifying the SUT (System Under Test) is the first step in the workflow.
Note
Needs to be further documented.
Identify Input fields
Identifying input fields and corresponding mutators for your fuzzing session is probably the most challenging part in the whole workflow. In this section we will demonstrate how interesting input fields can be chosen and corresponding mutators defined in the configuration file.
The configuration file provided to the Fuzzing Proxy contains abstract fuzzing instructions which are used at runtime for manipulation of proxied messages. This section will explain the basic concepts behind the configuration file and show you how to build a fuzzing scenario.
The configuration file is a plain JSON file following a specific schema. Below each single configuration block is described in detail.
Protocol Module
First, we will start with the protocolModule block which simply defines some basic information about the fuzzed protocol.
{
  "protocolModule": {
    "protocol": "MQTT",
    "encoding": "utf-8",
    "payload": "json" }
}
protocolobviously, defines which protocol will be used.encodingdefines how strings within the protocol fields should be handled.payloaddefines how to handle payloads within messages. Currently, onlyjsonandraware possible.
You can simply ask the Monkey to tell you the supported protocols:
./monkey protocols
Protocol Message Examples
For the next steps we will require some insights into the protocol chosen in the protocol module. Especially, the field namings and message structures provided by Scapy (which is used to decode and encode the messages) are required in the next steps. To get familiar with Scapy’s representation of protocol messages, you can use some provided message examples.
Again, simply ask the Monkey to give you some examples for your chosen protocol:
./monkey samples mqtt
Fuzzdata Generators
The Fuzzing Proxy is capable of using multiple fuzzdata generators. Currently, only a basic random generator is implemented. However, the integration of different kinds of more sophisticated fuzz-data generators like Fuzzino might be implemented in the future.
{
  "generators": [
  { "id": "g_rand_uniform" },
  { "id": "g_rand_uniform_2" },
  { "id": "g_with_seed", "seed": 123 } ]
}
For now, each basic generator requires only an unique id which we will use later on to reference the generators.
Additionallly, each generator can be initialised with a predefined seed for deterministic results.
Note
Generator IDs are enforced to start with g_
Fuzzing Mutators
Now things start getting interesting. Fuzzing Mutators are one of the basic concepts of the Fuzzing Proxy. The following block shows a set of different mutators, which will be explained in detail afterwards.
{
  "mutators": [
  { "id": "m_xor_protoname_fixed", "field": "protoname", "binary": "XOR", "hex": "0xA5A5" },
  { "id": "m_inc_protolevel", "field": "protolevel", "unary": "INCR" },
  { "id": "m_inc_clientid_len", "field": "clientIdlen", "unary": "INCR" },
  { "id": "m_replace_clientid", "field": "clientId",  "binary": "SET", "generator": "g_with_seed" },
  { "id": "m_replace_username", "field": "username",  "binary": "SET", "generator": "g_rand_uniform_2" },
  { "id": "m_invert_username_flag", "field": "usernameflag", "unary": "NOT" },
  { "id": "m_invert_flags_dup", "field": "DUP", "unary": "NOT" },
  { "id": "m_invert_flags_qos", "field": "QOS", "unary": "NOT" }]
}
Note
Mutator IDs are enforced to start with m_
Generally, each mutator requires an unique id and is always bound to a specific message field with
an operation. For now, two kinds of operations exist: unary and binary operations.
Unary Operators
Unary Operators, as the name implies, are unary with respect to the number of parameters which they expect.
An unary operator expects only one single parameter. It takes the value of the specified field (as the one and only parameter)
and applies a fuzzing operation on it.
The following example of an increment operator is an unary operation without any additional parameter:
{ "id": "m_inc_protolevel", "field": "protolevel", "unary": "INCR" }
Or, if you want to think about the mutator in a more functional way:
function increment(value) => { return (value + 1) }

protolevel := increment(protolevel)
The class of Unary Operators has the following concrete operators:
INCRwhich simply increments the given value by oneDECRwhich simply decrements the given value by oneNOTwhich simply inverts the given value
Binary Operators
Binary Operators on the other hand, take two parameters, the value of the specified field and either a fixed value
or a generator as the second parameter.
The following example of a xor operator is a binary operator with a fixed value:
{ "id": "m_xor_protoname_fixed", "field": "protoname", "binary": "XOR", "hex": "0xA5A5" }
This mutator will take value of the field protoname and apply the XOR operator with a fixed hex value of 0xA5A5.
Or, if you want to think about the mutator in a more functional way:
function xor(value, mask) => { return (value ^ mask) }

protoname := xor(protoname, 0xA5A5)
Additionally, Binary Operators can be also provided with generators which generate dynamically (random) values.
The following example of a set operator is a binary operator with a dynamically generated value:
{ "id": "m_replace_clientid", "field": "clientId", "binary": "SET", "generator": "g_with_seed" }
This mutator will take the value of the field clientId and appyl the SET operator with a dynamically generated
value generated by the generator with the ID g_with_seed.
Or, if you want to think about the mutator in a more functional way:
function set(value, generator) => { return generator.rand(typeof(value)) }

clientId := set(clientId, g_with_seed)
All Binary Operators can either be used with a fixed and predefined hex-value or with a generator.
The example below is also perfectly valid:
{ "id": "m_replace_clientid", "field": "clientId",  "binary": "SET", "hex": "0xA5A5" }
{ "id": "m_xor_protoname_fixed", "field": "protoname", "binary": "XOR", "generator": "g_with_seed" }
In a functional representation, these would look as follows:
function set(field, hex_mask) => { return hex_mask) }
function xor(field, generator) => { return (field ^ generator.rand(typeof(field)) }

clientId := set(clientId, 0xA5A5)
protoname := xor(protoname, g_with_seed)
The class of Binary Operators has the following concrete operators:
XORwhich applies an xor operation with the given second parameter on the given valueANDwhich applies an and operation with the given second parameter on the given valueORwhich applies an or operation with the given second parameter on the given valueSETwhich applies an set operation with the given second parameter on the given value
Filters
After mutators, filters are the second building blocks on the path of building fuzzing rules. These fuzzing filters are conceptually very similar to Wireshark’s DisplayFilters and serve pretty much the same purpose. As one might want to intercept more complex protocol behaviours, altering each single message would be a bad idea. The concept of filters allows the user to pick only specific messages for fuzzing, while other message not matching any filter are simply passed through without being fuzzed. The given example below contains two filters which will be explained in more detail afterwards:
{
  "filters": [
  {
    "id": "f_all_connect",
    "description": "This filter matches all connect packets",
    "direction": "Request",
    "filter": { "field": "type", "op": "-eq", "value": 1 }
  }, {
    "id": "f_publish_subscribe",
    "descritpion": "Matches all publish or subscribe or unsubscribe packets",
    "direction": "All",
    "left": {
      "left": { "filter": { "field": "type", "op": "-eq", "value": 3 } },
      "op": "OR",
      "right": { "filter": { "field": "type", "op": "-eq", "value": 8 } } },
    "op": "OR",
    "right": { "filter": { "field": "type", "op": "-eq", "value": 10 } }
  } ]
}
Note
Filter IDs are enforced to start with f_
The first filter with the ID f_all_connect is a quite simple one and more or less self explanatory.
However, the filter demonstrates the basic concept. While id and description are quite obvious, the
direction and filter fields require a little more explanation.
Filter Direction
The direction field defines the direction of the filter. Valid directions are Request, Response and All.
Filters with "direction": "Request" will be only applied on messages passing through the Fuzzing Proxy from the client to the server.
On the other hand, filters with "direction": "Response" will only look for responses coming from the server.
And obviously, "direction": "All" will look for both directions.
Filter Definition
The filter field is actually the part which defines the filtering criteria. The following example filter
matches all packets of the type = 1 (the CONNECT Control Packet in case of MQTT):
{ "filter": { "field": "type", "op": "-eq", "value": 1 } }
Conceptually, this filter can be thought of as follows:
But filters can be more complex and contain multiple filtering criteria as demonstrated by the filter with the ID f_publish_subscribe:
This filter contains a combination of three simple filters.
{
  "left": {
    "left": { "filter": { "field": "type", "op": "-eq", "value": 3 } },
    "op": "OR",
    "right": { "filter": { "field": "type", "op": "-eq", "value": 8 } } },
  "op": "OR",
  "right": { "filter": { "field": "type", "op": "-eq", "value": 10 } }
}
Conceptually, this filter can be thought of as follows:
As one can see, we have two types of operators (op) in filters.
The comparison operators are used within concrete filter definitions as shown below:
Valid comparison operators are:
-eqwhich stands for==-newhich stands for!=-gtwhich stands for>-ltwhich stands for<-gewhich stands for>=-lewhich stands for<=
The logical operators, on the other hand, are used to combine multiple single filter logically.
Valid logical operators are: OR, and AND
Rules
Finally, the Rules Engine can be build by combining mutators and filters to concrete fuzzing rules. The given example below contains two rules which will be explained in more detail afterwards:
{
  "rules": [
  {
    "match": "f_all_connect",
    "mutators": [ "m_inc_clientid_len", "m_xor_protoname_fixed", "m_inc_protolevel" ]
  }, {
    "match": "f_publish_subscribe",
    "distribution": {
      "model": "multinomial",
      "seed": 12345,
      "nxp": 10
      "items": [
        { "strength": 11, "mutators": [ "m_invert_flags_retain", "m_inc_flags_qos", "m_or_topic" ] },
        { "strength": 12, "mutators": [ "m_invert_flags_retain", "m_xor_topic", "m_inc_pl_length" ] },
        { "strength": 13, "mutators": [ "m_inc_pl_length" ] },
        { "strength": 14, "mutators": [ ] }
      ] }
  } ]
}
The first rule is a quite simple one and contains two fields. The match field references a matching filter
previously defined in Filters and a set of mutators previously defined in Fuzzing Mutators.
You can think of the first rule as follows: Once the matching filter with the ID f_all_connect matches
a message, apply all three given mutators with the IDs m_inc_clientid_len, m_xor_protoname_fixed and m_inc_protolevel to this message.
The second rule is a little more complex, though more flexible and powerful with regards to it’s capabilities to
manipulate protocol messages. Once again, the match field references a matching filter. However, this time
the rule does not contain a simple fixed list of mutators but rather a distribution of several lists.
Let’s have a closer look at the distribution block. The model field defines the kind of the distribution which
will be used to choose one of the items. Currently, multinomial distribution is the only one possible.
(The concrete implementation uses the numpy.random.multinomial
module.) The distribution can also be configured with a seed and nxp (Number of experiments). However,
these fields are optional and can be omitted.
The items list represents all the possibilities the distribution can choose from.
Each set of mutators within a distribution is not necessarily equally weighted. That means, you can favor
specific sets of mutators and disfavor others via the strength field. Thereby applies, the higher the strength,
the higher the probability to be chosen. In concrete, in the example above the distribution has four items with an overall strength of
\(11+12+13+14=50\). That means, the probability to get the empty list of mutators
(the last one, which in fact won’t manipulate any fields at all) is \(p_4=\frac{14}{50}=0.28\) whereas the probability to get
the first list is only \(p_1=\frac{11}{50}=0.22\) and so on.
Warning
The total number of rules/filters should be kept as small as possible. In worst case scenarios each single filter must be checked for each message. Therefore, messages which do not match any filter (or the last one) need to be checked agains each single filter. The filter mechanism has a \(O(n)\) time complexity. This might lead to performance issues on large sets of filters.
Note
The total number of items within a distribution has a \(O(1)\) time complexity, which means, you can theoretically have as many items as you need without influencing the runtime performance.
Checking the configuration
A fuzzing configuration can be become quite complex and confusing which might lead to errors at runtime.
To ensure that your configuration is valid, the validate command comes handy.
Once you have finished your configuration, ask the Monkey to validate your configuration:
./monkey validate {CONFIGURATION}
Where {CONFIGURATION} can be either a relative or absolute path to your configuration file.
Choose a Test Data Generator
As testcase generator you can either use a simple client of your choice or use an according IoT-Testware conformance test suite.
Running a Fuzzing Session
Once you have build and validated your configuration you are ready to start fuzzing. The Fuzzing Proxy can help you to start the Fuzzing Proxy:
./monkey fuzzing -l {LISTEN_PORT} -r {REMOTE_ADDRESS} -c {CONFIGURATION}
Where {LISTEN_PORT} is the port on which the fuzzing proxy will listen for incoming requests and forward
to {REMOTE_ADDRESS}:{LISTEN_PORT} with considering the rules given in {CONFIGURATION}.
The following sketch demonstrates the following fuzzing setup: 0.0.0.0:{LISTEN_PORT} <-> {REMOTE_ADDRESS}:{LISTEN_PORT}
If you need to further configure the ports and interfaces you can provide parameters as follows:
./monkey fuzzing -l {LOCAL_LISTEN_PORT} -r {REMOTE_ADDRESS} -p {REMOTE_LISTEN_PORT} -c {CONFIGURATION}
This will result in the following fuzzing setup: 0.0.0.0:{LOCAL_LISTEN_PORT} <-> {REMOTE_ADDRESS}:{REMOTE_LISTEN_PORT}
To stop the Fuzzing Proxy press Ctrl + C
Analyzing Fuzzing Logging
Once you have finished a fuzzing session, you will find within the logs folder a newly created folder with
a timestamped naming e.g. 20190822_13_38_24 (which is in fact the datetime when the Fuzzing Proxy was started).
Inside of this folder you will find at least the two log files fuzzing_operations.log and proxy_traffic.log
which can be used to analyze the fuzzing session.
In general, the proxy_traffic.log contains all events happened, mainly incoming and outgoing messages and network events.
On the other hand, the fuzzing_operations.log contains all events which were executed by the fuzzer during the reception
and the forwarding of each single messages.
Let’s have a closer look at an exemplary log file of a MQTT session.
First we will look into the proxy_traffic.log and go through the snipped line by line:
In line 1 we see a network event (TCP connection) coming from a client (127.0.0.1:58636) and on line 2
the client sent immediatelly a message over this connection. This message is a MQTT Connect Control Packet
triggered by the client to request a (MQTT) connection to the server. If you like to look into the MQTT message,
ask the Monkey to decode the bytestream for you:
./monkey decode -p mqtt -o '101c00044d5154540402003c00104d5154545f46585f436c69656e745f32'O
So far so good, everything went fine so far and the fuzzer didn’t intercept. In line 3 we can observe how the Fuzzing Proxy
proxies the original network event (TCP connection) to the SUT (192.168.56.101:1883) and forwards the original, though manipulated,
MQTT Connect Control Packet. Finally, the SUT reacts with an error handling routine
by simply closing the network connection due to a protocol violation.
So, what happend inside the Fuzzing Proxy and what was the reason for the protocol violation?
First, we might take a closer look at the incoming and outgoing MQTT packets:
Well, didn’t change that much. Let’s consult the fuzzing_operations.log to figure out what happened in between.
There we will find a line like the following one:
First of all, we can acknowledge this fuzzing operation took place in between the reception and forwarding of the
MQTT packet by comparing the timestamps. Second, by following the [f_all_connect.3] hint, we can clearly traceback
to applied rule, matching filter and set of mutators.
And finally, with [NOT(DUP)=0->1; NOT(QOS)=0->1] we get a summary of the complete set of mutators applied to this message.
In the following code block we can see the corresponding rule and the marked item:
{
  "match": "f_all_connect",
  "distribution": {
    "model": "multinomial",
    "seed": 3456,
    "nxp": 10,
    "items": [
      { "strength": 1, "mutators": [ "m_xor_protoname_fixed", "m_inc_protolevel" ] },
      { "strength": 12, "mutators": [ "m_replace_username", "m_invert_username_flag" ] },
      { "strength": 15, "mutators": [ "m_inc_clientid_len", "m_replace_clientid" ] },
      { "strength": 7, "mutators": [ "m_invert_flags_dup", "m_invert_flags_qos" ] },
      { "strength": 15, "mutators": [ ] }
    ] }
}
By having this information, we can now even further precise the protocol violation.
However, it should be noted, that this example is not a perfect fuzzing example as the broker responded perfectly conformant according to the specification without crashing or exposing any weaknesses. But this simple example should only serve as an illustration of the capabilities of the fuzzer and demonstrate the workflow.